
NETGEAR M4300, setup DHCP VLAN
Posted on October 31, 2018 • 4 minutes • 774 words
We bought our first 10GBase-T switch. Pretty nice, but setting it up proved a bit more complex then our SuperMicro switches. Here I documented my search to get servers to talk to each other over a VLAN using the switch to assign IP addresses, using DHCP.
Login & Connect
Logging in proved rather easy and was similar to SuperMicro’s, connect “through the back” using a RJ45 alike cable that is actually a serial cable to USB. (I don’t think this was included, but there alternatives) Once connected I could find the “COM” port windows assigned checking Bluetooth devices :

One could also open the device manager and find it under _COM _ports. I used putty as my VT100 terminal emulator, on any Linux distro there are plenty of options but the easiest option would be screen. The setting of this switch are : 115200 baud speed, 8 data bits, 1 stop bits, none parity, none flow control.
Login & connect option 2
Provided by Netgear is a USB to UART, you need this driver (on Win 10) to connect; you still need the VT100 terminal emulator, so that’s the same 🙂
Connect and enter twice and voila you can see the cli interface, the default login is “admin” and no password.
To get the assigned IP address :
# set ip
ip management vlan 1 10.0.0.10 /24

# get ip
show ip management

# or
show ip vlan
After you get the IP address or guess it, you can go to the more simple web-interface configuration option. In my case the IP was 169.254.100.100. to be greeted with a login page.
Changing the ip on a reset :
# start a new session
set sup-console
# login with admin/password

# elevate user :
enable
# enter admin password

# goto configure
configure

# try to config ip
ip management vlan 1 123.123.123.123 255.255.255.0

# or dhcp
ip management vlan 1 dhcp
Make VLAN
First I needed to make a VLAN, Switching -> VLAN -> basic -> VLAN Configuration. Giving a VLAN ID and a name (disable static). If everything works it should look like :
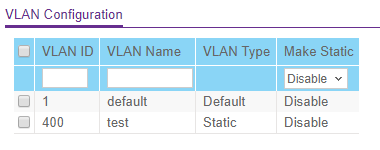
After this, you need to define the VLAN membership this can be done in Switching -> VLAN -> Advanced -> VLAN Membership. Go to VLAN ID you just made (in my case 400) and select group operation tag all then untag all, so that all ports show as untagged. (U).

From my basic understanding of VLAN’s and tagged packets, I figured that a port can only be part of one untagged VLAN. I’m probably wrong, but this “worked”. So I made all my ports that I intend to use for data to this new VLAN. Switching -> VLAN -> Advanced -> Port PVID Configuration. I changed VLAN member for all except my management port I’m using (1/0/1). Do this by entering the VLAN ID into VLAN Member and accepting the changes. It should look like :

Now for some reason, ports are still not able to communicate. Time to add a routing interface.
Routing Interface VLAN
note : changed from 1 to 254.
This is totally new to me so, bare along : Routing -> VLAN -> VLAN Routing Configuration; We need to add routing configuration, from the dropdown select our PVID (400) and create a IP address for the routing (end with 254) I decided on 10.0.0.254 for the IP and subnet mask 255.255.255.0 so eventually IP’s allowed will be 10.0.0.[0-255].
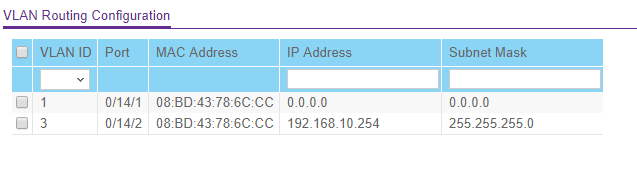
It’s important to remember this IP adres, as we will re-use it once we setup the DHCP.
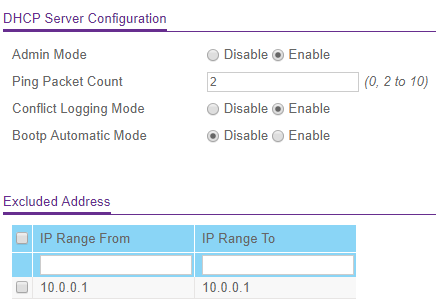
Setup DHCP service
Seamless next step, would you not say ? We need to setup the DHCP, which can be found : System -> Services -> DHCP Server -> DHCP Server Configuration.
We need to set the Admin Mode to _enabled, _and exclude our routing interface, so that this is not given out by the DHCP. It should look like :
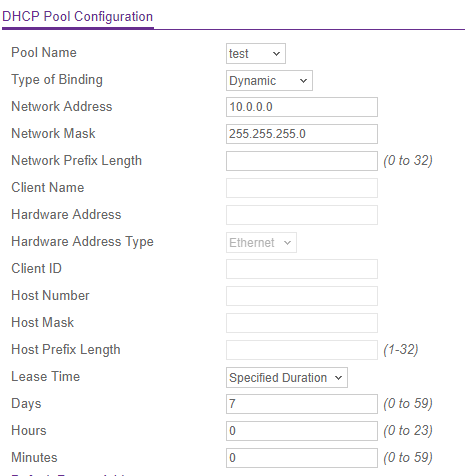
After this we are ready to create the DHCP pool, do this under System -> Services -> DHCP Server -> DHCP Pool Configuration.
Pool name : (random) Type of Binding : Dynamic. Network Addressshould be the one we picked for the routing interface and excluded in the previous step. But instead of 1 use 0. In our case Network Address is 10.0.0.0 and the netmask is 255.255.255.0 or length 24. I setup lease time, to 7 days, which is a weekly thing. Should end up looking like :
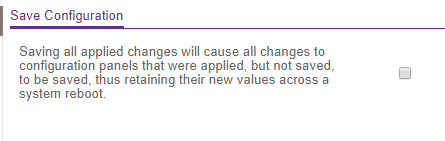
After this the only thing remaining is testing & saving the configuration. If you are happy with how it works save your configuration. Maintenance -> Save Configuration
useful resource : https://kb.netgear.com/30818/How-to-configure-routing-VLANs-on-a-NETGEAR-managed-switch-with-shared-internet-access